Python Tkinter Canvas: Shapes, Text, Images and Interactive Items
The Tkinter Canvas widget provides a drawable area for graphics and interactive objects. It can display text, lines, rectangles, ovals, arcs, polygons, bitmaps and images.
Canvas items can also be moved, resized, recolored, hidden, deleted and connected to mouse events. This makes Canvas useful for diagrams, dashboards, animations, drawing tools, games and other graphical interfaces.

(0, 0). The x-coordinate increases toward the right and the y-coordinate increases downward.- Create a Canvas
- Canvas Coordinates
- create_text()
- create_line()
- create_rectangle()
- create_oval() and Circles
- create_arc()
- create_polygon()
- create_image()
- create_bitmap()
- Embed Widgets with create_window()
- Canvas Item IDs and Tags
- Change, Move and Delete Items
- Canvas Item Options
- Canvas Widget Options
- Stipple and Active Options
- Shapes, Text and Image Example
- Canvas Background Image
- Canvas as an Interactive Button
- Responsive Canvas with Grid
- Multiple Canvas Widgets
- Canvas Item Mouse Events
- Scrollable Canvas
- Canvas Projects and Next Steps
- Common Mistakes
- Summary
Create a Tkinter Canvas 🔝
import tkinter as tk

root=tk.Tk()
root.geometry('300x250')

canvas=tk.Canvas(root, width=200, height=200, bg='white')
canvas.pack(padx=20, pady=20)

root.mainloop()
width and height specify the requested Canvas size in pixels.

Understanding Canvas Coordinates 🔝
Most Canvas drawing methods use x and y coordinates.
(x, y)For a normal Canvas:
(0, 0)is at the top-left,- larger x values move toward the right,
- larger y values move downward.
For example:
canvas.create_line(20, 50, 180, 50)draws a horizontal line because both points use the same y-coordinate.
Add Text with create_text() 🔝
import tkinter as tk

root=tk.Tk()
canvas=tk.Canvas(root, width=350, height=150)
canvas.pack()

canvas.create_text(175, 40, text='Welcome to plus2net.com', fill='#606060', font=('Times', 22, 'bold'))

root.mainloop()
Text Anchor
Coordinates normally identify the center of Canvas text. Use anchor when another reference point is required.
canvas.create_text(10, 10, text='Top Left', anchor='nw')Rotate Canvas Text
canvas.create_text(100, 100, text='Vertical', angle=90)Draw Lines with create_line() 🔝
import tkinter as tk

root=tk.Tk()
canvas=tk.Canvas(root, width=200, height=120)
canvas.pack()

canvas.create_line(10, 60, 190, 60, fill='#ff00ff', width=5)

root.mainloop()
Add an Arrow
canvas.create_line(10, 50, 180, 50, arrow='last')Common values are:
'first'
'last'
'both'
Polyline
A line can contain several coordinate pairs.
canvas.create_line(10, 100, 60, 20, 110, 100, 160, 20)Draw a Rectangle with create_rectangle() 🔝
A rectangle is defined by two opposite corners.
canvas.create_rectangle(30, 30, 150, 100, fill='#c0c0c0', outline='black')
The coordinates represent:
(x1, y1, x2, y2)Draw Ovals and Circles with create_oval() 🔝
An oval is drawn inside a rectangular bounding box.
canvas.create_oval(25, 25, 140, 100, fill='#c0c0c0')
Create a Circle
A circle is produced when the bounding box has equal width and height.
def create_circle(canvas, x, y, radius, **options):
    return canvas.create_oval(x-radius, y-radius, x+radius, y+radius, **options)

circle=create_circle(canvas, 80, 80, 30, fill='lightblue')
Draw an Arc with create_arc() 🔝
An arc also uses a bounding box.
canvas.create_arc(10, 10, 140, 140, start=15, extent=220, fill='#c0c0c0')

start specifies the starting angle and extent specifies how many degrees the arc covers.
Arc Styles
style=tk.PIESLICE
style=tk.ARC
style=tk.CHORD
Example:
canvas.create_arc(20, 20, 140, 140, start=0, extent=180, style=tk.ARC, width=4)Draw a Polygon with create_polygon() 🔝
Pass a sequence of x-y coordinate pairs.
canvas.create_polygon(5, 40, 15, 120, 130, 70, 35, 5, fill='#c0c0c0')
Display Images with create_image() 🔝
PNG or GIF with PhotoImage
import tkinter as tk

root=tk.Tk()
canvas=tk.Canvas(root, width=300, height=200)
canvas.pack()

photo=tk.PhotoImage(file='icon-dwn.png')
image_id=canvas.create_image(20, 20, image=photo, anchor='nw')

root.mainloop()PhotoImage in a variable such as photo. If Python garbage-collects the image object, the Canvas image can disappear.JPEG with Pillow
import tkinter as tk
from PIL import Image, ImageTk

root=tk.Tk()
canvas=tk.Canvas(root, width=400, height=300)
canvas.pack()

image=Image.open('photo.jpg')
photo=ImageTk.PhotoImage(image)
canvas.create_image(0, 0, image=photo, anchor='nw')

root.mainloop()
Add a Bitmap with create_bitmap() 🔝
import tkinter as tk

root=tk.Tk()
canvas=tk.Canvas(root, width=200, height=150)
canvas.pack()

canvas.create_bitmap(50, 50, bitmap='question')

root.mainloop()
More on Tkinter Bitmap
Embed Tkinter Widgets with create_window() 🔝
A Canvas can embed another Tkinter widget by creating a window item.
button=tk.Button(root, text='Click Me')
window_id=canvas.create_window(100, 80, window=button)
This is different from placing a normal widget over the Canvas with grid(), pack() or place(). The embedded widget becomes a Canvas window item and participates in Canvas positioning.
Canvas Item IDs and Tags 🔝
Every create_*() method returns an item ID.
rectangle=canvas.create_rectangle(20, 20, 120, 80, fill='yellow')
print(rectangle)
The ID can later be used to modify, move or delete that specific Canvas item.
Add a Tag
circle=canvas.create_oval(30, 30, 100, 100, fill='red', tags=('circle', 'shape'))A tag can identify one item or a group of items.
canvas.itemconfig('shape', state='hidden')This can affect all items carrying the shape tag.
Change, Move and Delete Canvas Items 🔝
Change Item Options with itemconfig()
canvas.itemconfig(rectangle, fill='lightblue', outline='navy')Read or Replace Coordinates with coords()
print(canvas.coords(rectangle))[20.0, 20.0, 120.0, 80.0]Set new coordinates:
canvas.coords(rectangle, 50, 50, 180, 120)Move Relative to the Current Position
canvas.move(rectangle, 20, 10)This moves the item 20 pixels right and 10 pixels down.
Get the Visual Bounding Box
print(canvas.bbox(rectangle))Delete an Item
canvas.delete(rectangle)Delete All Canvas Items
canvas.delete('all')coords() to read or replace coordinates. Use move() when the item should shift relative to its current position.Common Canvas Item Options 🔝
Available options depend on the type of Canvas item.
| Option | Purpose |
|---|---|
fill | Fill or text color, depending on the item type. |
outline | Outline color for shapes such as rectangles, ovals and polygons. |
width | Line or outline width. |
dash | Dash pattern for supported lines and outlines. |
stipple | Bitmap pattern used instead of a solid fill for supported items. |
state | Usually normal, disabled or hidden for Canvas items. |
tags | Assign one or more names used to manipulate groups of items. |
activefill | Fill used while the mouse pointer is over a supported item. |
activeoutline | Outline used while a supported item is active. |
activewidth | Width used while a supported item is active. |
activestipple | Stipple pattern used while supported item is active. |
disabledfill | Fill used when a supported item is disabled. |
disabledoutline | Outline used when a supported item is disabled. |
outline makes sense for shapes such as rectangles and ovals but not for ordinary text in the same way.Canvas Widget Options 🔝
The Canvas widget itself also has configuration options separate from the items drawn inside it.
| Option | Purpose |
|---|---|
width | Requested Canvas width. |
height | Requested Canvas height. |
background / bg | Canvas background color. |
borderwidth | Canvas border width. |
relief | Canvas widget border style such as flat, raised or sunken. |
cursor | Mouse cursor over the Canvas. |
scrollregion | Defines the scrollable Canvas coordinate area. |
xscrollcommand | Connects a horizontal Scrollbar. |
yscrollcommand | Connects a vertical Scrollbar. |
List Canvas Widget Configuration Options
print(canvas.config().keys())List Option Names and Current Values
for option in canvas.config():
    print(option, ':', canvas[option])
Using stipple and activestipple 🔝

This rectangle uses one fill pattern normally and another while the mouse pointer is over it.
import tkinter as tk

root=tk.Tk()
canvas=tk.Canvas(root, width=400, height=400)
canvas.pack()

canvas.create_rectangle(20, 20, 380, 380, fill='#ff6347', stipple='gray50', activefill='#ffd700', activestipple='gray25')

text="fill='#ff6347'\nstipple='gray50'\nactivefill='#ffd700'\nactivestipple='gray25'"
canvas.create_text(200, 200, text=text, fill='darkblue', font=('Arial', 14, 'bold'))

root.mainloop()
Canvas with Shapes, Text and an Image 🔝
import tkinter as tk

root=tk.Tk()
root.geometry('430x450')

canvas=tk.Canvas(root, width=400, height=400, bg='lightgreen')
canvas.grid(row=0, column=0, padx=5, pady=10)

canvas.create_text(290, 50, text='Welcome to plus2net', fill='#606060', font=('Times', 16, 'bold'))
rectangle=canvas.create_rectangle(60, 20, 180, 80)
canvas.create_oval(180, 90, 390, 200, fill='gray', dash=(25, 5, 1, 10), activedash=(50, 10), stipple='gray75', width=5, activestipple='gray25')
canvas.create_line(10, 10, 50, 50, arrow='last')
canvas.create_arc(50, 85, 180, 240, start=45, extent=135, fill='red')
canvas.create_polygon(35, 160, 70, 390, 180, 310, 260, 350, 200, 250, fill='yellow')

photo=tk.PhotoImage(file='top2.png')
canvas.create_image(315, 375, image=photo)

root.mainloop()
Use an Image as the Canvas Background 🔝
Create an image item at the top-left of the Canvas.
background=tk.PhotoImage(file='bg2.png')

canvas=tk.Canvas(root, width=1000, height=500)
canvas.grid(row=0, column=0)

background_id=canvas.create_image(0, 0, image=background, anchor='nw')
Other Canvas items created later appear above the background image.
Move Background Behind Existing Items
canvas.tag_lower(background_id)create_window(). A Canvas image alone does not turn Canvas into a Frame-style widget container.Vertical Text on Canvas as an Interactive Button 🔝

import tkinter as tk
import tkinter.font as tkfont

def button_press(event):
    event.widget.config(relief='sunken')
    message_var.set('Hi and welcome to plus2net')

def button_release(event):
    event.widget.config(relief='raised')

root=tk.Tk()
root.geometry('400x250')

font=tkfont.nametofont('TkDefaultFont')
text='plus2net '
height=font.measure(text)+10
width=font.metrics()['linespace']+10

canvas=tk.Canvas(root, height=height, width=width, background='SystemButtonFace', borderwidth=2, relief='raised')
canvas.create_text(4, 4, angle=90, anchor='ne', text=text, fill='SystemButtonText', font=font)
canvas.grid(row=0, column=0, padx=20, pady=20)

message_var=tk.StringVar(value='Welcome')
tk.Label(root, textvariable=message_var, font=('Times', 20)).grid(row=0, column=1, padx=5)

canvas.bind('<ButtonPress-1>', button_press)
canvas.bind('<ButtonRelease-1>', button_release)

root.mainloop()
Responsive Canvas in Grid Layout 🔝

import tkinter as tk

root=tk.Tk()
root.geometry('400x300')
root.rowconfigure(0, weight=1)
root.columnconfigure(0, weight=1)

canvas=tk.Canvas(root, bg='lightblue')
canvas.grid(row=0, column=0, sticky='nsew')

canvas.create_oval(50, 50, 150, 150, fill='yellow', outline='black')

root.mainloop()
sticky='nsew' allows the Canvas widget to expand with its grid cell.
The Canvas becoming larger does not automatically scale the coordinates or sizes of existing Canvas items. Resizing drawn objects requires separate code if that behaviour is needed.
More on responsive rows and columnsUse Multiple Canvas Widgets in a Grid 🔝
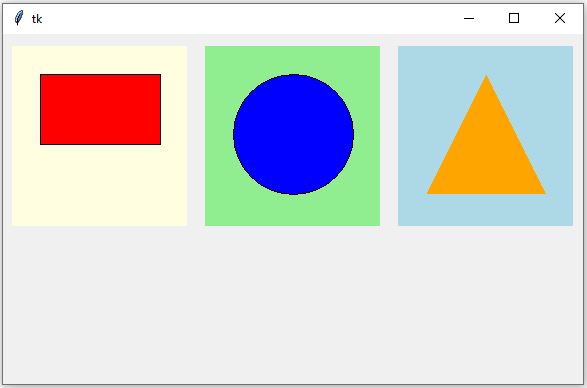
import tkinter as tk

root=tk.Tk()
root.geometry('620x350')

c1=tk.Canvas(root, width=180, height=180, bg='lightyellow')
c2=tk.Canvas(root, width=180, height=180, bg='lightgreen')
c3=tk.Canvas(root, width=180, height=180, bg='lightblue')

c1.grid(row=0, column=0, padx=10, pady=10)
c2.grid(row=0, column=1, padx=10, pady=10)
c3.grid(row=0, column=2, padx=10, pady=10)

c1.create_rectangle(30, 30, 150, 100, fill='red')
c2.create_oval(30, 30, 150, 150, fill='blue')
c3.create_polygon(30, 150, 90, 30, 150, 150, fill='orange')

root.mainloop()
Bind Mouse Events to Canvas Items 🔝
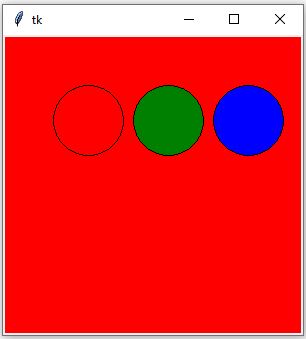
tag_bind() connects events to a Canvas item ID or tag.
import tkinter as tk

def change_background(event, color):
    canvas.config(bg=color)

root=tk.Tk()
root.geometry('320x250')

canvas=tk.Canvas(root, width=300, height=200, bg='white')
canvas.pack()

red_circle=canvas.create_oval(30, 50, 100, 120, fill='red', outline='black')
green_circle=canvas.create_oval(115, 50, 185, 120, fill='green', outline='black')
blue_circle=canvas.create_oval(200, 50, 270, 120, fill='blue', outline='black')

canvas.tag_bind(red_circle, '<Button-1>', lambda event: change_background(event, 'red'))
canvas.tag_bind(green_circle, '<Button-1>', lambda event: change_background(event, 'green'))
canvas.tag_bind(blue_circle, '<Button-1>', lambda event: change_background(event, 'blue'))

root.mainloop()
The Canvas background changes to the color of the clicked circle.
Bind an Event to a Tag
canvas.create_rectangle(20, 20, 100, 80, fill='yellow', tags='clickable')
canvas.create_oval(120, 20, 200, 100, fill='lightblue', tags='clickable')

canvas.tag_bind('clickable', '<Button-1>', callback)
Both items now use the same event binding.
Create a Scrollable Canvas 🔝
A Canvas can represent an area larger than its visible window.
import tkinter as tk
from tkinter import ttk

root=tk.Tk()

canvas=tk.Canvas(root, width=400, height=250, scrollregion=(0, 0, 1000, 800))
canvas.grid(row=0, column=0)

vs=ttk.Scrollbar(root, orient='vertical', command=canvas.yview)
hs=ttk.Scrollbar(root, orient='horizontal', command=canvas.xview)

canvas.config(yscrollcommand=vs.set, xscrollcommand=hs.set)
vs.grid(row=0, column=1, sticky='ns')
hs.grid(row=1, column=0, sticky='ew')

canvas.create_rectangle(700, 500, 900, 700, fill='lightblue')

root.mainloop()
Set scrollregion from Current Items
After creating Canvas items:
canvas.config(scrollregion=canvas.bbox('all'))This uses the bounding box of all Canvas items as the scrolling region.
Canvas Tutorials and Projects 🔝
After learning the Canvas basics, choose the next tutorial based on what you want to build.
Movement and Dragging
Move Canvas Items move(), Images and Mouse DraggingAnimation
Canvas Animation with Rectangles and CirclesCharts and Mathematical Graphics
Draw Sin and Cos Curves Arc, Scale and Dashboard PointerCommon Tkinter Canvas Mistakes 🔝
1. Forgetting that y Increases Downward
Moving by:
canvas.move(item, 0, 10)moves the item downward, not upward.
2. Losing the PhotoImage Reference
Keep the image object in a variable for as long as the Canvas image is needed.
3. Importing Pillow without Using It
Use tk.PhotoImage for supported image formats. Use Pillow when image loading or processing requires it, such as common JPEG workflows.
4. Treating Canvas Widget Options as Item Options
relief configures the Canvas widget itself:
canvas.config(relief='raised')It is not a rectangle or oval item option.
5. Assuming Every Item Supports Every Option
Canvas item configuration depends on item type.
6. Ignoring the Item ID Returned by create_*()
Store it when the item will later be updated or moved.
rectangle=canvas.create_rectangle(20, 20, 100, 80)7. Confusing coords() with move()
coords() reads or replaces coordinates. move() shifts an item by a relative amount.
8. Expecting Canvas Items to Resize Automatically
If the Canvas widget expands with the window, existing shapes retain their Canvas coordinates unless your program changes them.
9. Treating Canvas as a Frame
Use create_window() when a Tkinter widget should be embedded as a Canvas item.
10. Using Absolute Local Image Paths in Shared Code
Prefer project-relative paths:
photo=tk.PhotoImage(file='images/icon.png')instead of a machine-specific path such as D:\....
Tkinter Canvas Summary 🔝
- Canvas provides a coordinate-based drawing area.
- The normal origin is the top-left at
(0, 0). - x increases toward the right and y increases downward.
create_text()adds text.create_line()creates straight or multi-segment lines.create_rectangle()draws a rectangle from two opposite corners.create_oval()draws an ellipse inside a bounding box.- A square bounding box creates a circle.
create_arc()draws part of an oval.create_polygon()creates a shape from several coordinate pairs.create_image()places an image on the Canvas.- Keep a reference to
PhotoImageobjects. create_bitmap()displays bitmap resources.create_window()embeds another Tkinter widget as a Canvas item.- Every
create_*()method returns an item ID. - Tags can identify groups of Canvas items.
itemconfig()changes an existing item's options.coords()reads or replaces item coordinates.move()shifts an item relative to its current position.bbox()returns a visual bounding box.delete()removes Canvas items.tag_bind()connects mouse events to items or tags.- Canvas widget options and Canvas item options are different.
scrollregion,xviewandyviewsupport scrolling through larger Canvas areas.- Canvas items do not automatically scale when the widget is resized.

Subhendu Mohapatra
Author & Instructor at plus2net
I write and maintain practical tutorials on Python, PHP, SQL, JavaScript, HTML, jQuery, and web development at plus2net. The tutorials focus on clear explanations, working examples, and code that readers can test and adapt while learning.


Subscribe to our YouTube Channel here

 Python Video Tutorials