Tkinter pack Layout Manager
Managing layout while using widgets by using Pack.
Never mix Pack and Grid in same window.
Tkinter pack layout manager with option fill side expand anchor to place widgets in different places
Understanding Pack
Without any options all widgets will be placed vertically in a column. We can add side , fill and expand to manage the layout.side
side=LEFT | Placed at LEFT of Next element |
side=RIGHT | Placed at RIGHT of Next element |
side=BOTTOM | Placed at BOTTOM of next element |
side=TOP | Placed at TOP of next element |
side=left

import tkinter as tk
from tkinter import *
my_w=tk.Tk()
# Placed at LEFT of Next element b1
l1 = tk.Listbox(my_w,height=3,bg='yellow')
l1.pack(side=LEFT)

# Immaterial as no next element
b1=tk.Button(my_w,text='b1')
b1.pack(side=RIGHT)
my_w.mainloop()
side=LEFT ( three elements )
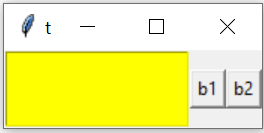
# Placed at LEFT of next b1
l1 = tk.Listbox(my_w,height=3,bg='yellow')
l1.pack(side=LEFT)

# Placed at LEFT of Next element  b2
b1=tk.Button(my_w,text='b1')
b1.pack(side=LEFT)

b2=tk.Button(my_w,text='b2')
b2.pack(side=RIGHT) # Immaterial
my_w.mainloop()
side=RIGHT
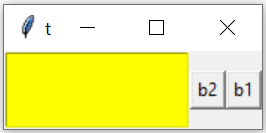
l1 = tk.Listbox(my_w,height=3,bg='yellow')
l1.pack(side=LEFT)
# Next element will be placed RIGHT of this l1

b1=tk.Button(my_w,text='b1')
b1.pack(side=RIGHT)
# Next element ( b2 ) will be left of this b1

b2=tk.Button(my_w,text='b2')
b2.pack(side=RIGHT)
# Next element ( not there) so Immaterial
my_w.mainloop()
side=BOTTOM
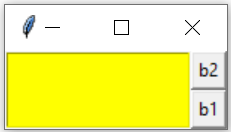
# Next element will be placed RIGHT of this l1
l1 = tk.Listbox(my_w,height=3,bg='yellow')
l1.pack(side=LEFT)

b1=tk.Button(my_w,text='b1')
b1.pack(side=BOTTOM)
#Takes Next row relative to next element ( b2 )

b2=tk.Button(my_w,text='b2')
b2.pack(side=RIGHT) # Immaterial
#b2 will be above b1
fill
fill=X | Expand horizontally to fill the available space |
fill=Y | Expand vertically to fill the available space |
fill=BOTH | Expand horizontally & vertically to fill the available space |
fill=X
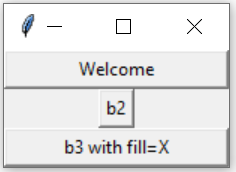
import tkinter as tk
my_w=tk.Tk()
b1=tk.Button(my_w,text="Welcome",width=20)
b1.pack() # Occupies the assigned width

# in the absence of any side value for b1, b2 starts in next row
b2=tk.Button(my_w,text="b2")
b2.pack()    # Width is as minimum, no expansion

b3=tk.Button(my_w,text="b3 with fill=X")
b3.pack(fill=X) # fill all horizontal space
my_w.mainloop()
fill=Y
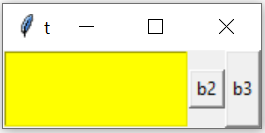
l1 = tk.Listbox(my_w,height=3,bg='yellow')
l1.pack(side=LEFT) # Occupies the assigned width

# in the absence of any side value for b1, b2 starts in next row
b2=tk.Button(my_w,text="b2")
b2.pack(side=LEFT)    # Width is as minimum, no expansion

b3=tk.Button(my_w,text="b3")
b3.pack(side=LEFT,fill=Y) # fill all vertical space
my_w.mainloop()
fill=BOTH
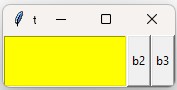
This example demonstrates the usage of fill=BOTH to expand the button both horizontally and vertically, occupying all available space.
import tkinter as tk

my_w = tk.Tk()
l1 = tk.Listbox(my_w, height=3, bg='yellow')
l1.pack(side=tk.LEFT)

b2 = tk.Button(my_w, text="b2")
b2.pack(side=tk.LEFT, fill=tk.BOTH, expand=True)

b3 = tk.Button(my_w, text="b3")
b3.pack(side=tk.LEFT, fill=tk.BOTH, expand=True)

my_w.mainloop()
Here, both buttons b2 and b3 fill both horizontal and vertical space due to the fill=BOTH and expand=True options.
expand
Default value is False.The expand option ( if True or 1 ) tells the manager to assign additional space to the widget box. If the parent widget is made larger than necessary to hold all packed widgets, any exceeding space will be distributed among all widgets that have the expand option set to a non-zero value.
Difference between expand and fill
expand option ( if set to True ) tells to take any not assigned space .The option fill asks the widget to take as much space as possible in given direction.
anchor : Align at top left
 Three side by side buttons are aligned at top left corner of the window
b1=tk.Button(my_w,bg='yellow',text='B1')
b1.pack(side='left',anchor='nw')
b2=tk.Button(my_w,bg='lightblue',text='B2')
b2.pack(side='left',anchor='nw')
b3=tk.Button(my_w,bg='yellow',text='B3')
b3.pack(side='left',anchor='nw')
Align at top right

b1=tk.Button(my_w,bg='yellow',text='B1')
b1.pack(side='right',anchor='ne')
b2=tk.Button(my_w,bg='lightblue',text='B2')
b2.pack(side='right',anchor='ne')
b3=tk.Button(my_w,bg='yellow',text='B3')
b3.pack(side='right',anchor='ne')
Align at bottom right

b1=tk.Button(my_w,bg='yellow',text='B1')
b1.pack(side='right',anchor='se')
b2=tk.Button(my_w,bg='lightblue',text='B2')
b2.pack(side='right',anchor='se')
b3=tk.Button(my_w,bg='yellow',text='B3')
b3.pack(side='right',anchor='se')
Align at bottom left

b1=tk.Button(my_w,bg='yellow',text='B1',font=font1)
b1.pack(side='left',anchor='sw')
b2=tk.Button(my_w,bg='lightblue',text='B2',font=font1)
b2.pack(side='left',anchor='sw')
b3=tk.Button(my_w,bg='yellow',text='B3',font=font1)
b3.pack(side='left',anchor='sw')
pack_forget() and destroy()
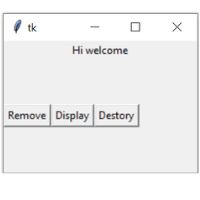 By using pack_forget() we can remove the widget from layout. The widget is not destroyed so we can restore the same. Here is a code to display and hide the message on button click. On click of button b1 the code
 command=lambda: l1.pack_forget() removes the widget. We can restore it by using pack() command=lambda: l1.pack(). We can delete the widget by using delete().
command=lambda: l1.destroy()
import tkinter as tk
from tkinter import *
my_w=tk.Tk()
my_w.geometry("220x150")
my_str = tk.StringVar(value='Hi welcome')
l1 = tk.Label(my_w,  textvariable=my_str, width=20 )
l1.pack(side=TOP)
b1=tk.Button(my_w,text='Remove',
             command=lambda: l1.pack_forget() )
b1.pack(side=LEFT)

b2=tk.Button(my_w,text='Display',
             command=lambda: l1.pack())
b2.pack(side=LEFT)

b3=tk.Button(my_w,text='Destroy',
             command=lambda: l1.destroy())
b3.pack(side=LEFT)


my_w.mainloop()
pack_info()
Get all information as a dictionary about the widget.print(b1.pack_info()){'in': , 'anchor': 'center', 'expand': 0, 'fill': 'none',
'ipadx': 0, 'ipady': 0, 'padx': 0, 'pady': 0, 'side': 'right'} pack_propagate(flag)
If the flag is set then it will resize the manager to hold all the widgets. This should be called from master widget as it controls the managerimport tkinter as tk
from tkinter import *
my_w=tk.Tk()
l1 = tk.Listbox(my_w,height=3,bg='yellow')
l1.pack(side=LEFT) #
b1=tk.Button(my_w,text='RIGHT')
b1.pack(side=RIGHT) # Placed right of Listbox
my_w.pack_propagate(0)
my_w.mainloop()pack_slaves()
get a list of widgetsprint(my_w.slaves())[<tkinter.Listbox object .!listbox>, <tkinter.Button object .!button>]pack options
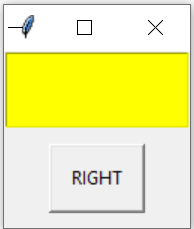 We have seen above about fill and side. Other options are listed here. ( Check pack_info() above to get dictionary of options with values
 print(b1.pack_info()) )
in : to pack widget inside ipadx : internal horizontal padding , default is 0ipady : internal vertical padding , default is 0padx : External horizontal padding , default is 0pady : External vertical padding , default is 0side : which side the widget is to be packed Here is an example of using these values
import tkinter as tk
from tkinter import *
my_w=Tk()
l1 = tk.Listbox(my_w,height=3,bg='yellow')
l1.pack(side=TOP) #

b1=tk.Button(my_w,text='RIGHT')
b1.pack(side=RIGHT,anchor='center',expand=1,fill=Y,
        ipadx=10,ipady=10,padx=10,pady=10) # set the values
print(b1.pack_info()) # reading the values
my_w.mainloop()print(b1.pack_info()) is here .
{'in': <tkinter.Tk object .>, 'anchor': 'center', 'expand': 1,
'fill': 'y', 'ipadx': 10, 'ipady': 10, 'padx': 10, 'pady': 10, 'side': 'right'}
Understanding Tkinter pack() Method to manage layout #python #tkinter #pythonGUI #packLayout #layout
Grid Layout place layout Frame rowconfigure() & columnconfigure()

Subhendu Mohapatra
Author & Instructor at plus2net
I write and maintain practical tutorials on Python, PHP, SQL, JavaScript, HTML, jQuery, and web development at plus2net. The tutorials focus on clear explanations, working examples, and code that readers can test and adapt while learning.
Connect:


Subscribe to our YouTube Channel here
This article is written by plus2net.com team.
https://www.plus2net.com

 Python Video Tutorials