Python Tkinter Drag and Drop: Move Widgets, Listbox Items and Files
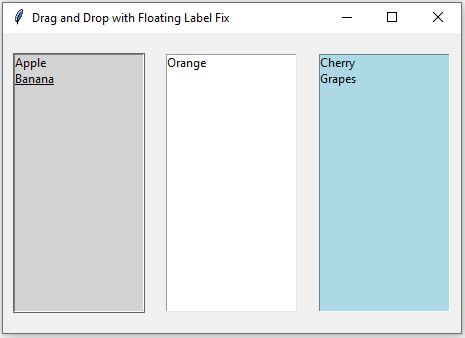
Drag and drop in Tkinter can be created by combining mouse events with widget positioning. A user presses the mouse button on a widget, moves the pointer while holding the button, and releases it at the required position.
Core Tkinter can handle dragging widgets and Listbox items. Dropping files from the operating system into a Tkinter application requires additional support such as the tkinterdnd2 package.
| Drag & Drop Scenario | Event / Package Used | Positioning / Action Method | Jump to Section |
|---|---|---|---|
| Move Any Widget (Label/Button) | <ButtonPress-1> + <B1-Motion> |
widget.place(x=x, y=y) |
View Code ↓ |
| Reorder Single Listbox | <ButtonPress-1> + <ButtonRelease-1> |
nearest(event.y), delete(), insert() |
View Code ↓ |
| Drag Between Multiple Listboxes | <B1-Motion> + Floating Label |
root.winfo_containing(x_root, y_root) |
View Code ↓ |
| Drop Files from OS (Explorer/Finder) | tkinterdnd2 (<<Drop>>) |
drop_target_register(DND_FILES) |
View Code ↓ |
| Move Canvas Shapes / Images | canvas.tag_bind() |
canvas.move(item_id, dx, dy) |
View Code ↓ |
- Mouse Events Used for Dragging
- Drag a Label
- How the Position Is Calculated
- Keep the Widget Inside the Window
- Drag Across Two Frames
- Reorder Listbox Items
- Drag Between Multiple Listboxes
- Drag Files into Tkinter
- Snap a Widget to a Grid
- Drag Canvas Items
- Common Drag-and-Drop Mistakes
- Summary
- Practice Questions
Mouse Events Used for Tkinter Drag and Drop 🔝
Basic widget dragging normally uses three Tkinter mouse events.
| Event | Purpose |
|---|---|
<ButtonPress-1> | Runs when the left mouse button is pressed. |
<B1-Motion> | Runs while the pointer moves with the left mouse button held down. |
<ButtonRelease-1> | Runs when the left mouse button is released. |
A widget is connected to an event by using bind().
widget.bind(
    '<ButtonPress-1>',
    start_drag
)

widget.bind(
    '<B1-Motion>',
    on_drag
)

widget.bind(
    '<ButtonRelease-1>',
    on_drop
)
Drag a Label Inside a Tkinter Window 🔝
This example allows a Label to move freely inside the main Tkinter window.
The mouse position is converted from screen coordinates to coordinates relative to the widget's parent. This avoids mixing the two coordinate systems while the widget is moving.
import tkinter as tk

def start_drag(event):
    widget=event.widget

    widget.drag_offset_x=event.x
    widget.drag_offset_y=event.y

    widget.lift()

def on_drag(event):
    widget=event.widget
    parent=widget.master

    x=(
        event.x_root
        -
        parent.winfo_rootx()
        -
        widget.drag_offset_x
    )

    y=(
        event.y_root
        -
        parent.winfo_rooty()
        -
        widget.drag_offset_y
    )

    widget.place(
        x=x,
        y=y
    )

root=tk.Tk()
root.geometry('400x300')
root.title('plus2net Drag and Drop')

label=tk.Label(
    root,
    text='Drag Me',
    bg='lightblue',
    padx=10,
    pady=5
)

label.place(
    x=50,
    y=50
)

label.bind(
    '<ButtonPress-1>',
    start_drag
)

label.bind(
    '<B1-Motion>',
    on_drag
)

root.mainloop()
How the Drag Position Is Calculated 🔝
Tkinter provides several mouse and widget coordinates. The important point is to know which coordinate system each value uses.
| Value | Meaning |
|---|---|
event.x | Mouse X position relative to the widget receiving the event. |
event.y | Mouse Y position relative to the widget receiving the event. |
event.x_root | Mouse X position relative to the screen. |
event.y_root | Mouse Y position relative to the screen. |
winfo_rootx() | Screen X position of the widget or container. |
winfo_rooty() | Screen Y position of the widget or container. |
When dragging begins, this code stores where inside the Label the user clicked:
widget.drag_offset_x=event.x
widget.drag_offset_y=event.y
During movement, the pointer's screen position is converted to coordinates relative to the parent:
x=event.x_root - parent.winfo_rootx() - widget.drag_offset_x
y=event.y_root - parent.winfo_rooty() - widget.drag_offset_y
The Label is then moved using:
widget.place(
    x=x,
    y=y
)Keep the Dragged Widget Inside the Window 🔝
The basic example allows coordinates outside the visible area. We can restrict the new position to the parent's width and height.
def on_drag(event):
    widget=event.widget
    parent=widget.master

    x=event.x_root - parent.winfo_rootx() - widget.drag_offset_x
    y=event.y_root - parent.winfo_rooty() - widget.drag_offset_y

    max_x=(
        parent.winfo_width()
        -
        widget.winfo_width()
    )

    max_y=(
        parent.winfo_height()
        -
        widget.winfo_height()
    )

    x=max(
        0,
        min(x, max_x)
    )

    y=max(
        0,
        min(y, max_y)
    )

    widget.place(
        x=x,
        y=y
    )
This keeps the complete widget visible inside its parent container.
Drag a Widget Across Two Frames 🔝
A Tkinter widget belongs to the parent supplied when it is created. If a Label is created as a child of frame1, its geometry is managed relative to frame1.
Creating the draggable Label as a child of the main window instead allows one coordinate system to cover both visual frame areas.
import tkinter as tk

def start_drag(event):
    widget=event.widget

    widget.drag_offset_x=event.x
    widget.drag_offset_y=event.y

    widget.lift()

def on_drag(event):
    widget=event.widget

    x=(
        event.x_root
        -
        root.winfo_rootx()
        -
        widget.drag_offset_x
    )

    y=(
        event.y_root
        -
        root.winfo_rooty()
        -
        widget.drag_offset_y
    )

    widget.place(
        x=x,
        y=y
    )

root=tk.Tk()
root.geometry('500x300')

frame1=tk.Frame(
    root,
    bg='lightgray',
    width=250,
    height=300
)

frame1.place(
    x=0,
    y=0
)

frame2=tk.Frame(
    root,
    bg='white',
    width=250,
    height=300
)

frame2.place(
    x=250,
    y=0
)

# Parent is root, not frame1
label=tk.Label(
    root,
    text='Drag Me',
    bg='lightblue',
    padx=10,
    pady=5
)

label.place(
    x=50,
    y=50
)

label.bind(
    '<ButtonPress-1>',
    start_drag
)

label.bind(
    '<B1-Motion>',
    on_drag
)

root.mainloop()Reorder Items in a Tkinter Listbox 🔝
Drag and drop can also be used to reorder items inside a Listbox.
The index selected on mouse press is stored. When the mouse is released, the item is removed from its old position and inserted at the new position.
import tkinter as tk

def start_drag(event):
    listbox=event.widget

    index=listbox.nearest(
        event.y
    )

    box=listbox.bbox(
        index
    )

    if box is None:
        listbox.dragged_index=None
        return

    top=box[1]
    height=box[3]

    if not (
        top <= event.y <= top + height
    ):
        listbox.dragged_index=None
        return

    listbox.dragged_index=index

def on_drop(event):
    listbox=event.widget
    source=listbox.dragged_index

    if source is None:
        return

    target=listbox.nearest(
        event.y
    )

    item=listbox.get(
        source
    )

    listbox.delete(
        source
    )

    if source < target:
        target -= 1

    listbox.insert(
        target,
        item
    )

    listbox.selection_clear(
        0,
        'end'
    )

    listbox.selection_set(
        target
    )

    listbox.dragged_index=None

root=tk.Tk()
root.geometry('300x250')

listbox=tk.Listbox(
    root
)

listbox.pack(
    padx=20,
    pady=20,
    fill='both',
    expand=True
)

for item in [
    'Apple',
    'Banana',
    'Cherry',
    'Orange',
    'Grapes'
]:
    listbox.insert(
        'end',
        item
    )

listbox.dragged_index=None

listbox.bind(
    '<ButtonPress-1>',
    start_drag
)

listbox.bind(
    '<ButtonRelease-1>',
    on_drop
)

root.mainloop()
When an item is dragged downward, deleting the original item changes the later indexes. Therefore, the target index is reduced by one:
if source < target:
    target -= 1
This prevents the item from being inserted one position lower than intended.
Drag Items Between Multiple Listboxes 🔝
For a more visual interface, a temporary floating Label can follow the mouse while an item moves between Listboxes.
The program performs four tasks:
- Read the item selected in the source Listbox.
- Create a floating Label containing the item's text.
- Move the floating Label with the pointer.
- Detect the destination Listbox and transfer the item when the mouse button is released.
import tkinter as tk

def start_drag(event):
    source = event.widget

    if source.size() == 0:
        return

    index = source.nearest(event.y)
    box = source.bbox(index)

    if box is None:
        return

    top = box[1]
    height = box[3]

    if not (top <= event.y <= top + height):
        return

    drag_data["source"] = source
    drag_data["index"] = index
    drag_data["item"] = source.get(index)

    floating_label.config(
        text=drag_data["item"]
    )

    move_floating_label()
    floating_label.lift()

def move_floating_label():
    x = root.winfo_pointerx() - root.winfo_rootx()
    y = root.winfo_pointery() - root.winfo_rooty()

    floating_label.place(
        x=x + 10,
        y=y + 10
    )

def on_drag(event):
    if drag_data["source"] is not None:
        move_floating_label()

def on_drop(event):
    source = drag_data["source"]

    if source is None:
        return

    floating_label.place_forget()

    target = root.winfo_containing(
        event.x_root,
        event.y_root
    )

    if target in listboxes and target is not source:
        source.delete(drag_data["index"])
        target.insert("end", drag_data["item"])

    drag_data["source"] = None
    drag_data["index"] = None
    drag_data["item"] = None

root = tk.Tk()
root.geometry("600x300")
root.title("Drag Items Between Listboxes")

listbox1 = tk.Listbox(
    root,
    selectmode="single",
    bg="lightgray"
)
listbox1.pack(
    side="left",
    padx=10,
    pady=20,
    fill="both",
    expand=True
)

listbox2 = tk.Listbox(
    root,
    selectmode="single",
    bg="white"
)
listbox2.pack(
    side="left",
    padx=10,
    pady=20,
    fill="both",
    expand=True
)

listbox3 = tk.Listbox(
    root,
    selectmode="single",
    bg="lightblue"
)
listbox3.pack(
    side="left",
    padx=10,
    pady=20,
    fill="both",
    expand=True
)

for item in [
    "Apple",
    "Banana",
    "Cherry",
    "Orange",
    "Grapes"
]:
    listbox1.insert("end", item)

listboxes = [
    listbox1,
    listbox2,
    listbox3
]

floating_label = tk.Label(
    root,
    bg="yellow",
    relief="solid",
    padx=5,
    pady=2
)

drag_data = {
    "source": None,
    "index": None,
    "item": None
}

for listbox in listboxes:
    listbox.bind("<ButtonPress-1>", start_drag)
    listbox.bind("<B1-Motion>", on_drag)
    listbox.bind("<ButtonRelease-1>", on_drop)

root.mainloop()
The floating Label is hidden before winfo_containing() is used. Otherwise, the floating Label itself could be detected as the widget below the pointer instead of the destination Listbox.
Drag Files from Explorer or Finder into Tkinter 🔝
Core Tkinter does not provide a general native file-drop interface for files dragged from the operating system. One option is the third-party tkinterdnd2 package.
Install tkinterdnd2
pip install tkinterdnd2Accept Dropped Files
import tkinter as tk
from tkinterdnd2 import DND_FILES, TkinterDnD

def on_drop(event):
    files=root.tk.splitlist(
        event.data
    )

    label.config(
        text='\n'.join(files)
    )

root=TkinterDnD.Tk()

root.geometry(
    '500x250'
)

root.title(
    'Drop Files Here'
)

label=tk.Label(
    root,
    text='Drag file(s) here',
    bg='lightgray',
    width=50,
    height=8
)

label.pack(
    padx=20,
    pady=40,
    fill='both',
    expand=True
)

label.drop_target_register(
    DND_FILES
)

label.dnd_bind(
    '<<Drop>>',
    on_drop
)

root.mainloop()
event.data contains the dropped path information. Using:
root.tk.splitlist(
    event.data
)
is better than simply treating event.data as one filename because multiple dropped files and filenames containing spaces can be returned in Tcl/Tk list format.
<<Drop>> event runs when the files are released over the target.Snap a Dragged Widget to a Grid 🔝
Instead of leaving the widget at any pixel position, the final coordinates can be rounded to fixed grid intervals.
For a 50-pixel grid:
grid=50

x=round(
    x / grid
) * grid

y=round(
    y / grid
) * grid
Snapping is usually more natural when it is applied on mouse release rather than on every movement.
def on_drop(event):
    widget=event.widget

    x=widget.winfo_x()
    y=widget.winfo_y()

    grid=50

    x=round(x / grid) * grid
    y=round(y / grid) * grid

    widget.place(
        x=x,
        y=y
    )
Bind it using:
label.bind(
    '<ButtonRelease-1>',
    on_drop
)
Dragging Items on a Tkinter Canvas 🔝
A Canvas item is different from a normal Tkinter widget. Canvas shapes, images and text are managed by the Canvas itself, so they are normally moved with Canvas methods rather than place().
For example:
canvas.move(
    item_id,
    dx,
    dy
)
or its coordinates can be changed with:
canvas.coords(
    item_id,
    x,
    y
)Common Tkinter Drag-and-Drop Mistakes 🔝
1. Mixing Screen and Widget Coordinates
event.x and event.y are relative to the event widget, while event.x_root and event.y_root are screen coordinates. Convert coordinates before using them with place().
2. Making the Widget Jump to the Pointer
Store the original click offset so the point grabbed by the user remains under the pointer during dragging.
3. Trying to Move a Child Widget into Another Parent
A widget created inside one Frame remains a child of that Frame. Use a common parent for objects that must move across several visual regions, or recreate the widget after the drop.
4. Forgetting the Release Event
<ButtonRelease-1> is useful for final actions such as snapping, validating a drop zone or transferring an item between Listboxes.
5. Reordering a Listbox Without Adjusting the Target Index
When an item is deleted before being inserted farther down the same Listbox, later indexes shift upward by one.
6. Treating File-Drop Data as One Plain Filename
With tkinterdnd2, use root.tk.splitlist(event.data) so paths containing spaces and multiple dropped files are handled correctly.
7. Using Widget Dragging Code for Canvas Objects
Normal widgets can use place(). Canvas objects should normally use Canvas methods such as move() or coords().
Summary of Tkinter Drag and Drop 🔝
<ButtonPress-1>starts a mouse drag.<B1-Motion>tracks pointer movement while the left button is held.<ButtonRelease-1>can process the final drop.event.xandevent.yare relative to the event widget.event.x_rootandevent.y_rootare screen coordinates.place()can reposition normal Tkinter widgets.- Dragging can be restricted to the parent widget's visible boundaries.
- Use a common parent when a draggable widget needs to move visually across several Frames.
- Listbox items can be reordered using
nearest(),get(),delete()andinsert(). - A floating Label can provide visual feedback while transferring items between Listboxes.
- Core Tkinter does not provide general operating-system file dropping.
tkinterdnd2can accept files dragged from Explorer, Finder or another file manager.splitlist()safely separates multiple dropped file paths.- Dragged widgets can be restricted to boundaries or snapped to a grid.
- Canvas objects use methods such as
move()andcoords()instead of widgetplace().

Subhendu Mohapatra
Author & Instructor at plus2net
I write and maintain practical tutorials on Python, PHP, SQL, JavaScript, HTML, jQuery, and web development at plus2net. The tutorials focus on clear explanations, working examples, and code that readers can test and adapt while learning.


Subscribe to our YouTube Channel here

 Python Video Tutorials