Python ipywidgets in Google Colab: Interactive Widgets and Examples
- What Is ipywidgets?
- Install and Import ipywidgets
- Your First ipywidget
- Reading and Changing Widget Values
- Using interact()
- IntSlider, Button and Label
- Widget Events: on_click() and observe()
- Dropdown, Checkbox and Text
- Using the Output Widget
- RangeSlider, ToggleButtons and ColorPicker
- DatePicker, Textarea and FileUpload
- BoundedFloatText, Password and RadioButtons
- Linking Widget Values
- Play and Progress Widgets
- Layout and Style
- VBox, HBox, Accordion, Tab and GridBox
- Common ipywidgets Problems
- Practice Project
- Frequently Asked Questions
- Summary
- Download Notebook
What Is ipywidgets? 🔝
ipywidgets is a Python library for adding interactive controls to
Google Colab and Jupyter notebooks.
Widgets can collect user input or display changing values without requiring a separate desktop GUI application.
Common ipywidgets controls include:
- sliders for numeric input;
- buttons for triggering Python functions;
- dropdown lists and radio buttons for selecting options;
- text boxes and text areas for user input;
- checkboxes and toggle buttons;
- date pickers and color pickers;
- progress bars;
- file upload controls;
- layout containers such as
VBox,HBox,TabandAccordion.
Widget values can also be observed, linked and passed to Python functions to create interactive notebook applications.
Install and Import ipywidgets 🔝
In many Google Colab environments, ipywidgets is already available.
Start by trying:
import ipywidgets as widgets

print(widgets.__version__)
If the import fails, install or update the package:
!pip install -U ipywidgetsAfter installation, import the widget classes required by the notebook.
from ipywidgets import IntSlider, Button, LabelYour First ipywidget 🔝
The following example creates an integer slider.
import ipywidgets as widgets
from IPython.display import display

slider=widgets.IntSlider(
    value=50,
    min=0,
    max=100,
    step=1,
    description='Value:'
)

display(slider)
The slider can be moved directly inside the notebook.
Its current value is available through the value attribute.
Reading and Changing Widget Values 🔝
Most input widgets provide a .value attribute.
Read the Current Value
print(slider.value)
If the slider is currently at 50, the output is:
50Change the Value from Python
slider.value=75The displayed slider changes to the new value.
widget.value is the main way to read or update the current value.
Using interact() 🔝
The interact() function provides one of the quickest ways to connect widgets to a Python function.
from ipywidgets import interact

def square(x):
    return x * x

interact(
    square,
    x=(0, 20)
)
A slider is created automatically for x. Moving the slider calls square() with the new value.
interact() with Text Input
from ipywidgets import interact

def welcome(name):
    return f"Welcome {name}"

interact(
    welcome,
    name='Alex'
)
Here, interact() creates a text input because the initial value is a string.
Using IntSlider, Button and Label Widgets 🔝
This example combines a slider, button and label.
The user selects a number with the slider and clicks the button. The Label then displays the selected value.
from ipywidgets import VBox, IntSlider, Button, Label
from IPython.display import display

slider=IntSlider(
    description='Value:',
    min=0,
    max=100,
    value=50
)

button=Button(
    description='Show Value',
    button_style='warning'
)

label=Label(
    value='Move the slider and click the button.'
)

def on_click(b):
    label.value=f"Slider is at {slider.value}"

button.on_click(on_click)

display(
    VBox(
        [slider, button, label]
    )
)
Widget Events: on_click() and observe() 🔝
Interactive notebook applications often need to run Python code when the user changes a widget.
Button on_click()
A Button provides the on_click() method.
def button_clicked(b):
    print('Button clicked')

button.on_click(button_clicked)
The callback receives the button object as an argument.
observe() for Value Changes
Widgets such as sliders, dropdowns and text inputs can be monitored with observe().
def value_changed(change):
    print(
        'New value:',
        change['new']
    )

slider.observe(
    value_changed,
    names='value'
)
The callback receives a change dictionary containing information about the update.
Useful entries include:
change['old']
change['new']
change['name']
change['owner']
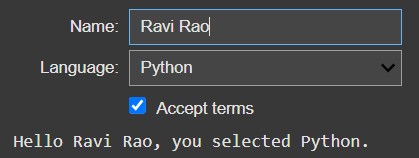
Using Dropdown, Checkbox and Text Widgets 🔝
from ipywidgets import Dropdown, Checkbox, Text, Output, VBox
from IPython.display import display

dropdown=Dropdown(
    options=[
        'Python',
        'JavaScript',
        'PHP'
    ],
    description='Language:'
)

checkbox=Checkbox(
    value=False,
    description='Accept terms'
)

text_input=Text(
    placeholder='Type your name',
    description='Name:'
)

output=Output()

def display_info(change):
    output.clear_output()

    with output:

        if checkbox.value:
            print(
                f"Hello {text_input.value}, you selected {dropdown.value}."
            )

        else:
            print(
                "You must accept the terms."
            )

dropdown.observe(
    display_info,
    names='value'
)

checkbox.observe(
    display_info,
    names='value'
)

text_input.observe(
    display_info,
    names='value'
)

display(
    VBox(
        [
            text_input,
            dropdown,
            checkbox,
            output
        ]
    )
)
Using the Output Widget 🔝
The Output widget creates an area where Python output can be displayed.
from ipywidgets import Output
from IPython.display import display

output=Output()

display(output)

with output:
    print('Hello from the Output widget')
The existing output can be cleared before displaying a new result.
output.clear_output()To replace previous output smoothly:
output.clear_output(
    wait=True
)
Using IntRangeSlider, ToggleButtons and ColorPicker 🔝
from ipywidgets import IntRangeSlider, ToggleButtons, ColorPicker, Button, Output, VBox
from IPython.display import display

range_slider=IntRangeSlider(
    value=[20, 80],
    min=0,
    max=100,
    step=5,
    description='Range:'
)

mode_selector=ToggleButtons(
    options=[
        'Simple',
        'Advanced',
        'Expert'
    ],
    description='Mode:'
)

color_picker=ColorPicker(
    value='#00aa00',
    description='Color:'
)

submit_btn=Button(
    description='Submit',
    button_style='success'
)

output=Output()

def show_results(b):
    output.clear_output()

    with output:
        print(
            f"Selected range: {range_slider.value}"
        )

        print(
            f"Mode: {mode_selector.value}"
        )

        print(
            f"Color: {color_picker.value}"
        )

submit_btn.on_click(show_results)

display(
    VBox(
        [
            range_slider,
            mode_selector,
            color_picker,
            submit_btn,
            output
        ]
    )
)
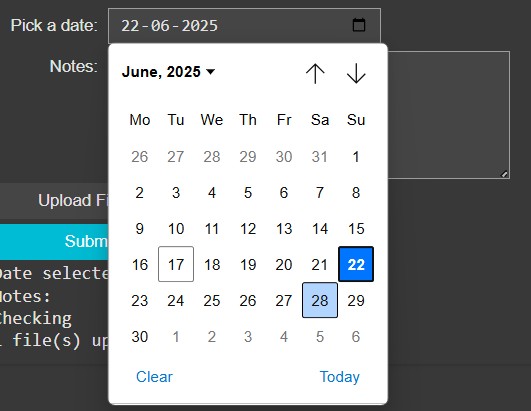
Using DatePicker, Textarea and FileUpload 🔝
from ipywidgets import DatePicker, Textarea, FileUpload, Button, Output, VBox, Layout
from IPython.display import display

date_picker=DatePicker(
    description='Pick a date:'
)

text_area=Textarea(
    placeholder='Enter your notes here...',
    description='Notes:',
    layout=Layout(
        width='400px',
        height='100px'
    )
)

file_upload=FileUpload(
    description='Upload File',
    multiple=False
)

submit_btn=Button(
    description='Submit',
    button_style='info'
)

output=Output()

def process_inputs(b):
    output.clear_output()

    with output:

        print(
            f"Date selected: {date_picker.value}"
        )

        print(
            f"Notes:\n{text_area.value}"
        )

        if file_upload.value:

            print(
                f"{len(file_upload.value)} file(s) uploaded."
            )

        else:
            print(
                'No files uploaded.'
            )

submit_btn.on_click(
    process_inputs
)

display(
    VBox(
        [
            date_picker,
            text_area,
            file_upload,
            submit_btn,
            output
        ]
    )
)
More on DatePicker with Database Date Queries
Using BoundedFloatText, Password and RadioButtons 🔝
This example combines several types of user input.
from ipywidgets import BoundedFloatText, Password, RadioButtons, Output, Button, VBox
from IPython.display import display

price_input=BoundedFloatText(
    value=10.0,
    min=1.0,
    max=100.0,
    step=0.5,
    description='Price:'
)

password_input=Password(
    description='Password:',
    placeholder='Enter password'
)

payment_mode=RadioButtons(
    options=[
        'Credit Card',
        'PayPal',
        'Bank Transfer'
    ],
    description='Payment:'
)

submit_btn=Button(
    description='Submit'
)

output=Output()

def process_form(b):
    output.clear_output()

    with output:
        print(
            f"Amount: {price_input.value}"
        )

        print(
            f"Selected option: {payment_mode.value}"
        )

        print(
            'Password field contains input.'
        )

submit_btn.on_click(
    process_form
)

display(
    VBox(
        [
            price_input,
            password_input,
            payment_mode,
            submit_btn,
            output
        ]
    )
)
The password itself is intentionally not printed.
Output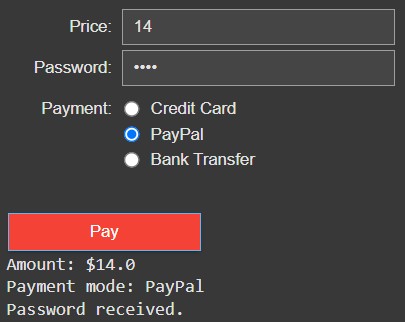
Linking Widget Values 🔝
Two widget properties can be synchronized so changing one widget changes the other.
The link() function links values through the Python kernel.
from ipywidgets import IntSlider, IntText, link
from IPython.display import display

slider=IntSlider(
    min=0,
    max=100
)

number=IntText()

my_link=link(
    (slider, 'value'),
    (number, 'value')
)

display(
    slider,
    number
)
Moving the slider changes the value in the text box, and editing the text box changes the slider.
jslink()
jslink() performs supported widget linking in the notebook front end.
from ipywidgets import jslink

jslink(
    (slider, 'value'),
    (number, 'value')
)
Using Play, IntText and FloatProgress with jslink() 🔝
from ipywidgets import Play, IntText, FloatProgress, HBox, jslink
from IPython.display import display

play=Play(
    interval=200,
    value=0,
    min=0,
    max=100,
    description='Press play'
)

int_text=IntText()

progress=FloatProgress(
    value=0,
    min=0,
    max=100,
    description='Progress:'
)

jslink(
    (play, 'value'),
    (int_text, 'value')
)

jslink(
    (play, 'value'),
    (progress, 'value')
)

display(
    HBox(
        [
            play,
            int_text,
            progress
        ]
    )
)
Widget Layout and Style Options 🔝
The Layout class controls properties such as width, height, margin and alignment.
from ipywidgets import Button, Layout, IntSlider
from IPython.display import display

b1=Button(
    description='Click Me',
    layout=Layout(
        width='200px',
        height='50px'
    )
)

s1=IntSlider(
    description='Value:',
    layout=Layout(
        width='100%'
    )
)

display(
    b1,
    s1
)
Common Layout Properties
width
height
margin
padding
display
justify_content
align_items
grid_template_columns
These options can be combined with container widgets to organize larger notebook interfaces.
Using Container Widgets: VBox, HBox, Accordion, Tab and GridBox 🔝
Container widgets organize several controls into one interface.
VBox and HBox
from ipywidgets import Button, VBox, HBox
from IPython.display import display

b1=Button(
    description='One'
)

b2=Button(
    description='Two'
)

display(
    VBox(
        [b1, b2]
    )
)

display(
    HBox(
        [b1, b2]
    )
)
Accordion, Tab and GridBox
from ipywidgets import Accordion, Tab, GridBox, IntSlider, Checkbox, Layout
from IPython.display import display

accordion=Accordion(
    children=[
        IntSlider(),
        Checkbox()
    ]
)

accordion.set_title(
    0,
    'Slider'
)

accordion.set_title(
    1,
    'Checkbox'
)

tab=Tab(
    children=[
        IntSlider(),
        Checkbox()
    ]
)

tab.set_title(
    0,
    'Tab 1'
)

tab.set_title(
    1,
    'Tab 2'
)

grid=GridBox(
    children=[
        IntSlider(),
        IntSlider(),
        Checkbox(),
        Checkbox()
    ],

    layout=Layout(
        grid_template_columns='50% 50%'
    )
)

display(
    accordion,
    tab,
    grid
)
Accordion and Tab are useful for separating interface sections, while GridBox can arrange widgets into rows and columns.
Common ipywidgets Problems 🔝
1. Widget Does Not Display
Make sure the object is either the last expression in the notebook cell or explicitly passed to display().
from IPython.display import display

display(slider)
2. ImportError for ipywidgets
If the package is unavailable in the current notebook environment, install or update it:
!pip install -U ipywidgets3. Callback Runs Every Time Text Changes
The following observer runs whenever the widget's value changes:
text_input.observe(
    my_function,
    names='value'
)
For a form that should run only when the user submits it, use a Button with on_click() instead.
4. Output Keeps Repeating
Clear the previous Output widget content before displaying the new result:
output.clear_output(
    wait=True
)
5. Widget Values Are Not Automatically Python Function Arguments
Read the current value using:
slider.value
dropdown.value
text_input.value
Alternatively, use interact() when automatic function-to-widget binding is suitable.
Practice Project: Temperature Converter 🔝
A useful practice project is an interactive Celsius and Fahrenheit converter.
Use:
FloatTextfor the temperature;RadioButtonsfor the conversion direction;Buttonto perform the calculation;Outputto display the result;VBoxorHBoxto arrange the controls.
Complete Example
from ipywidgets import FloatText, RadioButtons, Button, Output, VBox
from IPython.display import display

temperature=FloatText(
    value=0,
    description='Temperature:'
)

conversion=RadioButtons(
    options=[
        'Celsius to Fahrenheit',
        'Fahrenheit to Celsius'
    ]
)

button=Button(
    description='Convert'
)

output=Output()

def convert_temperature(b):

    output.clear_output()

    with output:

        if conversion.value == 'Celsius to Fahrenheit':

            result=(temperature.value * 9 / 5) + 32

            print(
                f"{temperature.value} C = {result:.2f} F"
            )

        else:

            result=(temperature.value - 32) * 5 / 9

            print(
                f"{temperature.value} F = {result:.2f} C"
            )

button.on_click(
    convert_temperature
)

display(
    VBox(
        [
            temperature,
            conversion,
            button,
            output
        ]
    )
)
Frequently Asked Questions 🔝
!pip install -U ipywidgets.
value attribute. For example, slider.value, dropdown.value or text_input.value.
on_click() is commonly used with Button widgets. observe() monitors changes to widget attributes such as value.
interact() automatically creates suitable widgets for a Python function and calls the function whenever the widget values change.
VBox, HBox, GridBox, Accordion and Tab to organize multiple widgets.
Summary of ipywidgets in Google Colab 🔝
ipywidgetsadds interactive controls to Google Colab and Jupyter notebooks.- Common widgets include
IntSlider,Button,Dropdown,Checkbox,Text,DatePickerandFileUpload. - Use
.valueto read or change many widget values. interact()can automatically connect function arguments to widgets.on_click()runs a callback when a Button is clicked.observe()can monitor changes to widget properties.- The
Outputwidget provides a controlled area for displaying results. link()andjslink()can synchronize widget properties.Layoutcontrols properties such as width, height and alignment.VBox,HBox,GridBox,AccordionandTaborganize larger interfaces.- Widgets can be combined with Python functions to create interactive notebook tools and demonstrations.
| Feature | Typical Use |
|---|---|
IntSlider |
Select a numeric value |
Dropdown |
Select one option |
Button |
Trigger a Python callback |
Output |
Display controlled output |
observe() |
React to value changes |
interact() |
Automatically connect widgets to a function |
VBox / HBox |
Arrange widgets vertically or horizontally |
GridBox |
Create a grid layout |
Download Sample ipywidgets Notebook 🔝
Download the sample notebook containing ipywidgets examples for sliders, buttons, dropdowns, layouts, containers and other interactive controls.
Download Notebook (.ipynb)Data Entry Form Using Colab and ipywidgets
Create an interactive data entry form in Google Colab using Python and ipywidgets.
Read Full TutorialDatePicker Examples Google Colab ipywidgets Data Entry Form

Subhendu Mohapatra
Author & Instructor at plus2net
I write and maintain practical tutorials on Python, PHP, SQL, JavaScript, HTML, jQuery, and web development at plus2net. The tutorials focus on clear explanations, working examples, and code that readers can test and adapt while learning.


Subscribe to our YouTube Channel here

 Python Video Tutorials