Inserting Data to sqlite table
Add records to sqlite Student table by taking user entered inputs from a Tkinter window.
There are three parts in this script.
- Part 1: Create the GUI window using tkinter.
- Part 2: Validate the user entered data.
- Part 3: Add data to sqlite table.
The GUI , data handling part of this tutorial is same as MySQL data insert tutorial. The difference in code between MySQL database and SQLite part is highlighted here. For easy understanding the full code is repeated here.
Inserting data to Excel workbook
Inserting data to Excel workbook
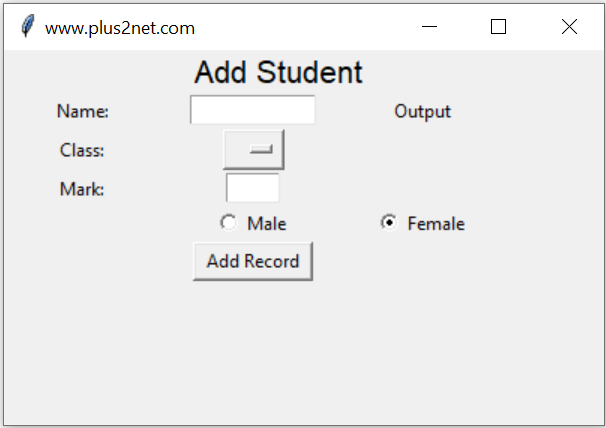
Part 1 : Tkinter window to accept user inputs
User will enter four input data using our Tkinter window. Main components are hereName : String of name through a text box t1
Class : Select one option from the dropdown OptionMenu
Mark : Integer value ( number ) through text box t3
Sex : Selection through a pair of radio buttons ( Male , Female or other )
Submit : Button to trigger a click event to handle all the inputs.
There are Labels to show message about the input data ( l1,l2,l3 ) and one final Label ( l5 ) to display the output or return id of the record after inserting the data in table. One OptionMenu ( opt1) is used for selection of class.
l0 = tk.Label(my_w,  text='Add Student',
              font=('Helvetica', 16), width=30,anchor="c" )
l0.grid(row=1,column=1,columnspan=4)
l1 = tk.Label(my_w,  text='Name: ', width=10,anchor="c" )
l1.grid(row=3,column=1)
# add one text box
t1 = tk.Text(my_w,  height=1, width=10,bg='white')
t1.grid(row=3,column=2)
l2 = tk.Label(my_w,  text='Class: ', width=10 )
l2.grid(row=4,column=1)
# add list box for selection of class
options = StringVar(my_w)
options.set("") # default value
opt1 = OptionMenu(my_w, options, "Three", "Four", "Five")
opt1.grid(row=4,column=2)
l3 = tk.Label(my_w,  text='Mark: ', width=10 )
l3.grid(row=5,column=1)
# add one text box
t3 = tk.Text(my_w,  height=1, width=4,bg='white')
t3.grid(row=5,column=2)
radio_v = tk.StringVar()
radio_v.set('Female')
r1 = tk.Radiobutton(my_w, text='Male', variable=radio_v, value='Male')
r1.grid(row=6,column=2)
r2 = tk.Radiobutton(my_w, text='Female', variable=radio_v, value='Female')
r2.grid(row=6,column=3)
b1 = tk.Button(my_w,  text='Add Record', width=10,
               command=lambda: add_data())
b1.grid(row=7,column=2)
my_str = tk.StringVar()
l5 = tk.Label(my_w,  textvariable=my_str, width=10 )
l5.grid(row=3,column=3)
my_str.set("Output")b1 = tk.Button(my_w, text='Add Record', width=10,
command=lambda: add_data())
b1.grid(row=7,column=2)def add_data():
flag_validation=True # set the flag
my_name=t1.get("1.0",END) # read name
my_class=options.get() # read class
my_mark=t3.get("1.0",END) # read mark
my_gender=radio_v.get() # read gender
# length of my_name , my_class and my_gender more than 2
if(len(my_name) < 2 or len(my_class)<2 or len(my_gender) < 2 ):
flag_validation=False
try:
val = int(my_mark) # checking mark as integer
except:
flag_validation=False
if(flag_validation):
# Part 3 database insert part
else:
l5.config(fg='red') # foreground color
l5.config(bg='yellow') # background color
my_str.set("check inputs.")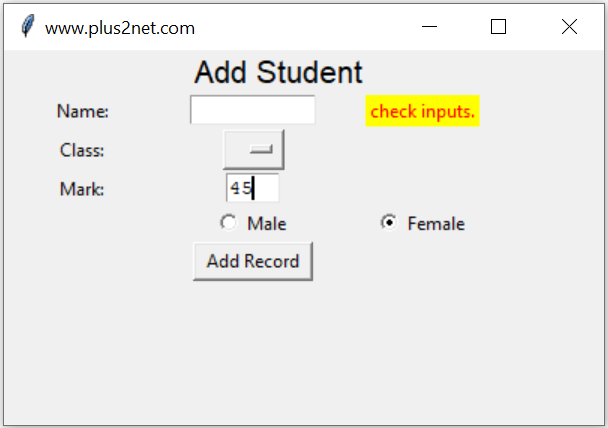
In this code we first set one flag validation ( flag_validation ) to True, if any where the validation of the inputs fails then we will change this status of validation to False. ( this is part of the above code )
if(len(my_name) < 2 or len(my_class)<2 or len(my_gender) < 2 ):
flag_validation=False
try:
val = int(my_mark) # checking mark as integer
except:
flag_validation=False Database connection
Connect to database by using the sqlite3 .import sqlite3
my_conn = sqlite3.connect('my_db.db')my_data=(None,my_name,my_class,my_mark,my_gender)
my_query="INSERT INTO student values(?,?,?,?,?)"
my_conn.execute(my_query,my_data)
my_conn.commit()The difference in code between SQLite and MySQL is in two parts.
1. Connection string
2. Format of Query to add parameters ( SQLite uses ? , MySQL it is % )
Our student table has one Primary Key as ID column. So after adding the record we can collect the unique id of this primary key and display it to user to show successful completion of adding record. Here last_insert_rowid() stores the value of this new ID.
1. Connection string
2. Format of Query to add parameters ( SQLite uses ? , MySQL it is % )
x=my_conn.execute('''select last_insert_rowid()''')
id=x.fetchone()
l5.grid()
l5.config(fg='green') # foreground color
l5.config(bg='white') # background color
my_str.set("ID:" + str(id[0]))
l5.after(3000, lambda: l5.grid_remove() )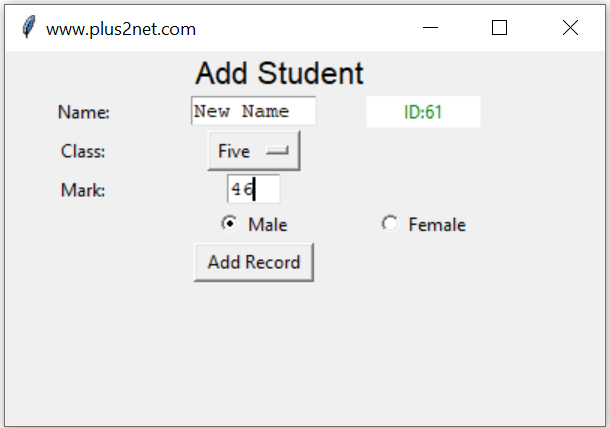
We have used the Label l5 to display the id of the record added. This display of Id ensures that the record is inserted successfully.
Adding a time delay
We want to show the ID ( after adding the record ) or the error message for some time and it should vanish after the time delay. In above code the last line does that for us. Learn more on how to add or remove the widget in a grid here.l5.after(3000, lambda: l5.grid_remove() ) t1.delete('1.0',END) # reset the text entry box
t3.delete('1.0',END) # reset the text entry box l5.config(fg='green') # foreground color
l5.config(bg='white') # background color
my_str.set("ID:" + str(id.lastrowid))# www.plus2net.com
# download updated script at https://www.plus2net.com/python/tkinter-sqlite-insert.php
import sqlite3
my_conn = sqlite3.connect('my_db.db')
#print("Opened database successfully");
import tkinter as tk
from tkinter import *
my_w = tk.Tk()
my_w.geometry("400x250")
my_w.title("www.plus2net.com")
# add one Label
l0 = tk.Label(my_w, text='Add Student',
font=('Helvetica', 16), width=30,anchor="c" )
l0.grid(row=1,column=1,columnspan=4)
l1 = tk.Label(my_w, text='Name: ', width=10,anchor="c" )
l1.grid(row=3,column=1)
# add one text box
t1 = tk.Text(my_w, height=1, width=10,bg='white')
t1.grid(row=3,column=2)
l2 = tk.Label(my_w, text='Class: ', width=10 )
l2.grid(row=4,column=1)
# add list box for selection of class
options = StringVar(my_w)
options.set("") # default value
opt1 = OptionMenu(my_w, options, "Three", "Four", "Five")
opt1.grid(row=4,column=2)
l3 = tk.Label(my_w, text='Mark: ', width=10 )
l3.grid(row=5,column=1)
# add one text box
t3 = tk.Text(my_w, height=1, width=4,bg='white')
t3.grid(row=5,column=2)
radio_v = tk.StringVar()
radio_v.set('Female')
r1 = tk.Radiobutton(my_w, text='Male', variable=radio_v, value='Male')
r1.grid(row=6,column=2)
r2 = tk.Radiobutton(my_w, text='Female', variable=radio_v, value='Female')
r2.grid(row=6,column=3)
b1 = tk.Button(my_w,  text='Add Record', width=10,
               command=lambda: add_data())
b1.grid(row=7,column=2)
my_str = tk.StringVar()
l5 = tk.Label(my_w, textvariable=my_str, width=10 )
l5.grid(row=3,column=3)
my_str.set("Output")
def add_data():
flag_validation=True # set the flag
my_name=t1.get("1.0",END) # read name
my_class=options.get() # read class
my_mark=t3.get("1.0",END) # read mark
my_gender=radio_v.get() # read gender
# length of my_name , my_class and my_gender more than 2
if(len(my_name) < 2 or len(my_class)<2  or len(my_gender) < 2 ):
            flag_validation=False
     try:
        val = int(my_mark) # checking mark as integer
     except:
        flag_validation=False
if(flag_validation):
my_str.set("Adding data...")
try:
#print("Connected to database successfully")
my_data=(None,my_name,my_class,my_mark,my_gender)
            my_query="INSERT INTO student values(?,?,?,?,?)"
            my_conn.execute(my_query,my_data)
            my_conn.commit()
	    x=my_conn.execute('''select last_insert_rowid()''')
            id=x.fetchone()
            l5.grid()
            l5.config(fg='green') # foreground color
            l5.config(bg='white') # background color
            my_str.set("ID:" + str(id[0]))
            l5.after(3000, lambda: l5.grid_remove() )
	t1.delete('1.0',END)  # reset the text entry box
	t3.delete('1.0',END)  # reset the text entry box
except sqlite3.Error as my_error:
l5.grid()
#return error
l5.config(fg='red') # foreground color
l5.config(bg='yellow') # background color
print(my_error)
my_str.set(my_error)
else:
l5.grid()
l5.config(fg='red') # foreground color
l5.config(bg='yellow') # background color
my_str.set("check inputs.")
l5.after(3000, lambda: l5.grid_remove() )
my_w.mainloop()
my_conn.close()We can display 10 records from student table without any user input.
Displaying records from student table
Subscribe to our YouTube Channel here
This article is written by plus2net.com team.
https://www.plus2net.com

 Python Video Tutorials