Area html tag for hyper links on images
<img src=map.jpg  usemap="#sections">

<map name="sections">
<area shape="circle" coords="62,39,25" href="my_area1.php"
 alt="Going to Area 1">
<area shape="rect" coords="213,36,378,93" href="my_area2.php"
 alt="Going to Area 2">
<area shape="poly" coords="255,224,320,224,321,200,255,224"
 href="my_area3.php" alt="to Area 3">
 </map>
Clickable areas on an Image
We can link different areas of a image to different pages by creating hyper links on the Image sections. In this single interactive image below we have clickable regions where user can click the different areas and navigate to different sections of this site.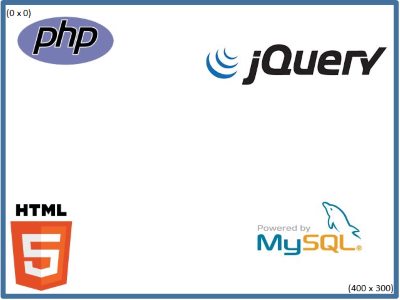
Move Mouse over the image
Check the source code below, we have added help text by using onMuousover and onMouseOut events. The cursor shape is changed by using style command.
HTML
<img src=images/map.jpg  usemap="#sections" style=cursor:crosshair;>

<map name="sections">
<area shape="circle" coords="62,39,25" href="../php_tutorial/site_map.php" alt="PHP  " target=_blank  onMouseOver="setVisibility('inline', 'On PHP, a circle  shape x1=62,y1=39,r=25');"
  onMouseOut="setVisibility('none','Out of PHP');">

<area shape="rect" coords="213,36,378,93" href="../jquery/site_map.php" alt="JQUERY " target=_blank onMouseOver="setVisibility('inline', 'On JQuery, a rectangular shape x1=213,y1=36,x2=378,y2=93');"
 onMouseOut="setVisibility('none','Out of Jquery');">

<area shape="poly" coords="255,224,320,224,321,200,342,212,359,230,359,254,255,254,255,224"
href="../sql_tutorial/site_map.php" alt="My SQL " target=_blank
onMouseOver="setVisibility('inline', 'On MySQL, a poly  shape x1=255,y1=224,x2=320,y2=224,x3=321,y3=200,x4=342,y4=212,x5=359,y5=254,x6=255,y6=254,x7=255,y7=224');"
onMouseOut="setVisibility('none','Out of MySQL');">

<area shape="poly" coords="8,203,15,282,39,290,65,282,71,203,8,203 " href="site_map.php"
alt="HTML " target=_blank onMouseOver="setVisibility('inline', 'On HTML , a poly  shape x1=8,y1=203,x2=15,y2=282,x3=39,y3=290,x4=65,y4=282,x5=71,y5=203,x6=8,y6=203');"
onMouseOut="setVisibility('none','Out of HTML');">
</map>Attributes of <AREA>:
| Attribute | Description |
|---|---|
| ALT | A text to be displayed to browser when Image is not shown |
| COORDS | A set of coordinates of the area on the image. The set value depens on the SHAPE attribute. |
| HREF | URL of the document linked to |
| HREFLANG | If href tag is there then this specifies the language of the target. |
| NAME | It can be refered by script or dom. |
| MEDIA | About the linked resources |
| HREFLANG | If href tag is there then this specifies the language of the target. |
| SHAPE | rect|circle|poly|default: Based on this COORDS take set of values, for RECT it takes x1,y1,x2,y2,x3,y3,x4,y4. For CIRCLE it is x,y,r ( r is the radious from center at x, y ). For poly it is x1,y1,x2,y2... For default it is the full image. |
| TARGET | _self|_blank|_parent|_top: How the linked document to open. |
<area shape='rect' cords='20,20,50,60'>We can add the target or href to the above tag like this
<area shape='rect' cords="20,20,50,60" href='mypage.php'><area shape='rect' cords="20,20,50,60" href='mypage.php' alt='About my page'>JavaScript integrated for interaction
<script>
function setVisibility(visibility,msg) {
document.getElementById('sub').textContent  = msg;
}
</script>id = 'sub'.
<div id="sub" class='display_box'>Move Mouse over the image</div><style>
.display_box{
position: relative;
FONT-SIZE: 14px;
font-family: Verdana;
padding:5px;
width:100%;
height: 150px;
background-color: #ffff00;
border: 2px solid red;
border-radius: 5px;
word-wrap: break-word;
}
</style>HTML <MAP> Image Display
This article is written by plus2net.com team.

| USAMA | 08-01-2010 |
| Good, i got the idea about html web progrmming language | |
| dany | 23-02-2010 |
| it is very useful for the beginners who d'nt about the HTML.... | |
| bethel | 27-02-2010 |
| this is great. our teacher wants us to make our own webpage. and it sucks! haha! :) thanks for putting the tags. | |
| imran | 31-03-2010 |
| its very nice idea about the html web programing | |
| dylan | 11-04-2010 |
| thanks this was a lot of help! | |
| surendra | 12-01-2012 |
| Dear Sir your tutorials very nice thankyou, one doubt for me i arrange html &css but not navigation bar linking another page how please tell me thankyou | |
| michael | 03-10-2012 |
| Hope this works | |